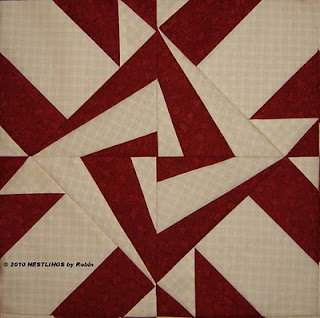
This is what 1 block looks like and you can see that the red and white were alternated in the center so that you get a nice twist or swirl affect. I searched my stash for red and white and found this wonderful little gingerbread man print for my red...so cute.
I want to give you some measurements for making your paper piecing experience a bit easier and reduce waste. You will need to copy the pattern from the magazine 16 times....remember 4 quadrants per block x 4 blocks.
If you cut all your pieces out first,
1. you can lay them out in the order you will be sewing to avoid confusion
2. you can chain piece and it cuts your time.
The block is numbered 1-9 and I am giving you a measurement that will insure that each piece will be covered.
1= 3 1/2" x 6" (16) 2= 2 1/2" x 4 1/2" (16)
3= 2" x 2 1/2" (16) 4= 2 1/2" x 4 1/2" (16)
5= 2 1/2" x 3 1/4" (16) 6= 2" x 2 1/2" (16)
7= 2 1/2" x 7 1/2" (8 red/8 white)
8= 2 1/2" x 6 1/2" (8 red/8 white)
9= 1 1/2" x 4" (8 red/8 white)
As stated before you will need 1 yard of red and 1 yard of white fabric.
My paper piecing tips are:
1. Lower your stitch length to help perforate the paper as you sew. On my machine, I lower it to a 1.4 and I use regular copy paper as my foundation.
2. I would suggest using the Add-a-Quarter Ruler if you have access to it.
3. I also take a colored pencil and place a checkmark in each area of my templates to match the color fabric I am to put there...helps to keep me from getting confused:)

This is my sewing area and if you are able, I would highly recommend this. There is an Ott light (any desk lamp will work) to my left along with a small cutting board/rotary cutter and the Add-A-Quarter ruler. You can also see the piles of red/white rectangles all precut. 3. I also take a colored pencil and place a checkmark in each area of my templates to match the color fabric I am to put there...helps to keep me from getting confused:)

 This photo shows that you are placing fabrics right sides together on the back side of the printed template. If you can see the triangular outline above the red, notice how the red is positioned so that when pressed open it will cover the point of the triangle.
 This photo shows how the stitch line looks after chain piecing. On straight lines such as the one above, chain piecing is easier than coming in at an angle. On the pieces where you have to come in a little further, don't cut your thread, just lift foot and needle and then put needle back down into the paper right before the line. All the pieces will be connected by a thread and all those minutes of cutting your thread and restarting between each piece really do make a difference.
So I chain piece all the blocks: 1 to 2, separate, press them all open, trim for piece 3 placement, sew all of 3 to 2, repeat, etc.
When chain piecing the thread will interfere a bit with preparing your template for the next piece (in photo above see how thread goes all the way to the edges) but it is ok because the paper has been perforated and easily tears to where you need it.

This photo above shows how I have torn back the paper and folded it back ON the line where I will sew next. The outlines of triangles you see are on the back side of the paper and shows the importance of having that light there!
Now for the Add-A-Quarter ruler ....once you fold back that paper, the ruler has a lip that fits against the fold so you can trim to a 1/4". This puts your seam allowances in as you sew and you get a more precise fit to your pieces of fabric as you place them.
 Here is the same piece from above with the paper folded back, the ruler in place, and my small rotary cutter ready to make my life a bit easier:)
The next step will be the green striped triangles. You have enough red and white left over to cut your strips:
Red: 4 @ 4 1/2" x 13" White: 4 @ 4 1/2" x 9"
For the green triangles you will need 2/3 of a yard. From this cut 2 strips @ 11 1/8" x 40". Stack the 2 strips together and cut 11 1/8" inches in so that you end up with 4 squares @ 11 1/8" sq. These four squares will be cut once on the diagonal for 8 triangles.
NOTE: It would be better to make quarter triangles so that your bias edge was toward the inside but I went with this measurement to save on yardage so be very careful of your bias edge and try not to stretch it.
From the strips now cut 4 squares @ 7 1/8" square. These four squares will be cut on the diagonal once for a total of 8 triangles.
 Follow this photo (or diagram below) for placement:
Lay a 4 1/2" x 13" red strip out right side up and place a larger triangle to either side of it with the long side creating the diagonal.
Sew the triangles on from the bottom of the strip up.
Press seams to the triangles.
Fold the red strip in half at the top and make a mark where the halfway point is (should be 2 1/4" in from the edge).
***See left side of photo above and how square the red strip looks***
Lay completed piece out on a cutting board and following the line of the diagonal to the halfway mark, trim away the corners of the top of the red strip.
***See right side of photo above and how the red strip is pointed now***
Follow this process for all four larger triangle units.
Repeat the process above for assembling the smaller triangle units with the white strips.
Once all triangle units have been assembled, you will attach to the 24 1/2" square.
Fold bottom edge of red strip in half on the larger triangle units to crease your center mark. This will be your guide for pinning to the center seam.
You will sew a triangle unit to top and bottom and then the 2 opposing sides --Press toward the triangle units.
Fold bottom edge of white strip in half to crease your center mark. This will be your guide for pinning to where the seams are from the larger triangle units.
 Following this diagram be sure that you sew on the red triangle units first: top and bottom and then the 2 sides.
Hope you are all on your way to creating something lovely. Please don't hesitate to ask questions if you get stuck.
See you here on the 6th of December:)


2 comments:
Robin, I'm working on making a block and not for the tree skirt. I am making a block with just two fabrics like you show here. For sections 2 and 4 you recomment cutting 2.5" x 4.5". I found this to be too short for the paper section. Can you check this for me as perhaps I'm getting me sections mixed up. Thanks.
I have remeasured and 2 1/2" x
4 1/2" is correct. I will say that after checking my measurements against the template from the magazine, it is a bit tight on the 2 1/2" width but not by much.
When you say 'too short' which dimension is the issue?
Post a Comment