Showing posts with label add-a-quarter ruler. Show all posts

Tuesday, February 1, 2022

Winter Games QAL: Blizzard Supplies

 We are 3 days out from the start
of the Winter Olympics 2022 in
Beijing China!
Time to support our athletes
that have trained tirelessly
for this one moment!!
I am excited to see your 
fabric selections.
You saw mine HERE.
Please show progress 
over in my

If you are new to the conversation,
go read the introduction HERE
We will wait...
Ok, now that you are back, 
let's talk supplies.

Winter Games

Still love the Magic sizing 
for PRESSING all my seams
nice and flat.
*You see my favorite 
Bohin pencil is back.
That will come in handy
depending on the value
of your fabrics if you 
are doing hand applique'.

Other items in the picture are: 
 Karen Kay Buckley
serrated scissors for cutting
my applique' (especially
cutting into V points/curves.

Let's not forget my 
favorite hand applique'
thread: 50wt Aurifil thread.

The Add-a-Quarter (R) 
ruler 12" is a great asset
for making sure you don't
accidentally cut off a 
seam allowance....
Ask me how I know:)
OK, don't ask-lol.

Not shown but my favorite
fusible web is Wonder Under #805.
These items make my life 
so much easier.

I know we all have our
own favorite tools so 
assemble what you need
based on this supply list below:
https://www.etsy.com/listing/1163772155/winter-games-quilt-pattern-pdf?click_key=f7ab7f801fbfe4b4e361fd3f36d12e831ee6719e%3A1163772155&click_sum=cdc10e3a&ref=shop_home_feat_3

Right click the image to save
to your computer so you can
use it as a checklist before Friday.
Don't forget the jingle bells:)
See you in 3 short days!
~~~

Monday, November 22, 2010

Tree Skirt-Along Pt. 2

Welcome back! I hope you were all able to find a copy of the magazine so we can get started. Technically as I write this it is still November 22nd for 22 more minutes:) which means you will have plenty of time to work on this before the holidays.

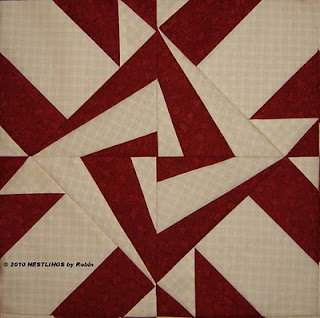
This is what 1 block looks like and you can see that the red and white were alternated in the center so that you get a nice twist or swirl affect. I searched my stash for red and white and found this wonderful little gingerbread man print for my red...so cute.

I want to give you some measurements for making your paper piecing experience a bit easier and reduce waste. You will need to copy the pattern from the magazine 16 times....remember 4 quadrants per block x 4 blocks.

If you cut all your pieces out first,
1. you can lay them out in the order you will be sewing to avoid confusion
2. you can chain piece and it cuts your time.

The block is numbered 1-9 and I am giving you a measurement that will insure that each piece will be covered.
1= 3 1/2" x 6" (16) 2= 2 1/2" x 4 1/2" (16)
3= 2" x 2 1/2" (16) 4= 2 1/2" x 4 1/2" (16)
5= 2 1/2" x 3 1/4" (16) 6= 2" x 2 1/2" (16)

7= 2 1/2" x 7 1/2" (8 red/8 white)
8= 2 1/2" x 6 1/2" (8 red/8 white)
9= 1 1/2" x 4" (8 red/8 white)

As stated before you will need 1 yard of red and 1 yard of white fabric.

My paper piecing tips are:
1. Lower your stitch length to help perforate the paper as you sew. On my machine, I lower it to a 1.4 and I use regular copy paper as my foundation.

2. I would suggest using the Add-a-Quarter Ruler if you have access to it.

3. I also take a colored pencil and place a checkmark in each area of my templates to match the color fabric I am to put there...helps to keep me from getting confused:)

This is my sewing area and if you are able, I would highly recommend this. There is an Ott light (any desk lamp will work) to my left along with a small cutting board/rotary cutter and the Add-A-Quarter ruler. You can also see the piles of red/white rectangles all precut.
This photo shows that you are placing fabrics right sides together on the back side of the printed template. If you can see the triangular outline above the red, notice how the red is positioned so that when pressed open it will cover the point of the triangle.
This photo shows how the stitch line looks after chain piecing. On straight lines such as the one above, chain piecing is easier than coming in at an angle. On the pieces where you have to come in a little further, don't cut your thread, just lift foot and needle and then put needle back down into the paper right before the line. All the pieces will be connected by a thread and all those minutes of cutting your thread and restarting between each piece really do make a difference.

So I chain piece all the blocks: 1 to 2, separate, press them all open, trim for piece 3 placement, sew all of 3 to 2, repeat, etc.


When chain piecing the thread will interfere a bit with preparing your template for the next piece (in photo above see how thread goes all the way to the edges) but it is ok because the paper has been perforated and easily tears to where you need it.
This photo above shows how I have torn back the paper and folded it back ON the line where I will sew next. The outlines of triangles you see are on the back side of the paper and shows the importance of having that light there!

Now for the Add-A-Quarter ruler ....once you fold back that paper, the ruler has a lip that fits against the fold so you can trim to a 1/4". This puts your seam allowances in as you sew and you get a more precise fit to your pieces of fabric as you place them.

Here is the same piece from above with the paper folded back, the ruler in place, and my small rotary cutter ready to make my life a bit easier:)

The next step will be the green striped triangles. You have enough red and white left over to cut your strips:

Red: 4 @ 4 1/2" x 13" White: 4 @ 4 1/2" x 9"

For the green triangles you will need 2/3 of a yard. From this cut 2 strips @ 11 1/8" x 40". Stack the 2 strips together and cut 11 1/8" inches in so that you end up with 4 squares @ 11 1/8" sq. These four squares will be cut once on the diagonal for 8 triangles.
NOTE: It would be better to make quarter triangles so that your bias edge was toward the inside but I went with this measurement to save on yardage so be very careful of your bias edge and try not to stretch it.

From the strips now cut 4 squares @ 7 1/8" square. These four squares will be cut on the diagonal once for a total of 8 triangles.

Follow this photo (or diagram below) for placement:

Lay a 4 1/2" x 13" red strip out right side up and place a larger triangle to either side of it with the long side creating the diagonal.
Sew the triangles on from the bottom of the strip up.

Press seams to the triangles.

Fold the red strip in half at the top and make a mark where the halfway point is (should be 2 1/4" in from the edge).

***See left side of photo above and how square the red strip looks***

Lay completed piece out on a cutting board and following the line of the diagonal to the halfway mark, trim away the corners of the top of the red strip.

***See right side of photo above and how the red strip is pointed now***

Follow this process for all four larger triangle units.


Repeat the process above for assembling the smaller triangle units with the white strips.


Once all triangle units have been assembled, you will attach to the 24 1/2" square.

Fold bottom edge of red strip in half on the larger triangle units to crease your center mark. This will be your guide for pinning to the center seam.

You will sew a triangle unit to top and bottom and then the 2 opposing sides --Press toward the triangle units.

Fold bottom edge of white strip in half to crease your center mark. This will be your guide for pinning to where the seams are from the larger triangle units.

Following this diagram be sure that you sew on the red triangle units first: top and bottom and then the 2 sides.

Hope you are all on your way to creating something lovely. Please don't hesitate to ask questions if you get stuck.
See you here on the 6th of December:)


Monday, November 8, 2010

100 Quilt Blocks Blog Tour Monday

IT'S COMING..... On newstands November 16th, Volume 2 of Quiltmaker's 100 Quilt Blocks...can you feel the anticipation? This is my first time participating in the 100 Quilt Blocks Collector's Edition and also my first time participating in a blog tour....it is all very exciting. There will be many giveaways here and there including the original signed blocks from this issue. You will want to go 'there' (100QB Blog) to visit all the designers linked to the blog tour and to enter the drawings for fun prizes. Everyone who leaves a comment on my blog will be entered to win a free copy of Quiltmaker's 100 Quilt Blocks Volume 2. At the end of this post you will find an additional opportunity to create, participate, and win so come along for the journey:)
Here is my block, "Spiked Pinwheels" #125 on page 34. The paper piece template is available in the magazine. I have been experimenting with paper piece designs lately which is quite a departure from the applique designs I am used to creating. The first time I tried paper piecing, I was very intimidated and not overly thrilled. Now I find it easy and even enjoy the monotony of taking out the paper. Paper piecing offers such accuracy and the designs I am working on now offer the quiltmaker a variety of personalized creations based on color placement and block rotation.
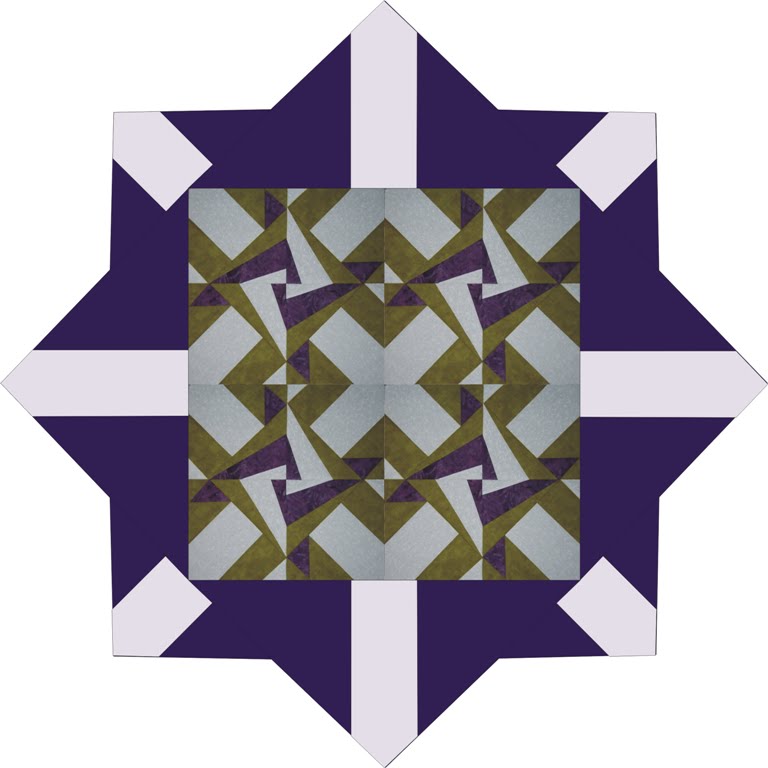
You will need 4 quadrants to make one block and this is what the colorway in the magazine looks like in a 3 across x 4 down block layout...look at that wonderful secondary design. Keeping the center fabric a light color really gives you a sparkling star effect.

This photograph shows a completely different look by rotating the quadrants before sewing the block together. I was amazed at the striping you get when you multiply the blocks into a quilt. Think of all the color possibilities.

Then one day as I was driving down the highway, I noticed a soybean field that had started to turn that acid green color. Along the highway rows of white and bright purple wildflowers had been added-what a striking color combination.
I know not everyone loves earthy autumn colors the way I do, so here is a completely different colorway for you---

I love the vividness of this and notice I only used 3 colors in this version vs. 6 in the original block. I also alternated the color placement in the center vs. using the same color in the same placement in all 4 quadrants.

This is how a quilt would look in this colorway/layout. The German in me is a bit put off by the crooked feeling it gives off but that is also what makes it kind of cool! Just changing the color placement in the centers gives it a zig zag feel.

I felt that the picture of the whole quilt might overwhelm some especially if this is your first attempt at paper piecing (I promise it is easy!) so I pared it down to a 4 block layout. Once these triangle pieces were added, I started to get very excited.

Who is up for a challenge?? I have never made a tree skirt before and I think this pattern would be perfect so here is what I am proposing:
Peppermint Swirls.
The instructions for this tree skirt will be given in 3 sets:
November 8th: The center 4 blocks and initial fabric requirements
November 22nd: The striped triangle sets
December 6th: The finishing instructions including cutting the hole, quilting, and binding.
These dates make each step very attainable and gets it finished in time for a sweet Christmas gift.

You will need:
1 Yard each of red fabric and white fabric. This will complete 4 blocks with enough left over to add the stripes to the triangle sets in the next installment.
The instructions for the block will be in the magazine (on stands Nov 16th). You will make 4 quadrants for one block and you will make 4 blocks.
NOTE: See the color layout here and notice that the centers have been reversed for 2 quadrants. Two quadrants have a red/white/red placement and two have a white/red/white placement which allows for the swirl effect.

My paper piecing tips are:
1. Lower your stitch length to help perforate the paper as you sew. On my machine, I lower it to a 1.4 and I use regular copy paper as my foundation.
2. I would suggest using the Add-a-Quarter Ruler if you have access to it.
3. I also take a colored pencil and place a checkmark in each area of my templates to match the color fabric I am to put there...helps to keep me from getting confused:)
Paper piecing isn't your thing? Please let me know why in the comment section (be sure you leave a way for me to contact you) so that I can still enter you to win a FREE copy of 100 Quilt Blocks. I will announce the winner on this blog on Friday Morning. Good Luck:)

Paper piecing is your thing? Great! Follow along for the next 5 weeks, email a picture of your completed top (I am giving us all a Nov/Dec craziness out:) to robin@nestlingsbyrobin.com , and with your permission I will be posting all our wonderful tree skirts in a special Dec 14th post.

In addition, every completed top will be entered into a drawing for 2 FREE patterns of the winner's choice from my website. They make great stocking stuffers:)