Welcome to my first
Benartex Ambassador
project for 2023!
Meet "Heartland" by
Cheryl Haynes.
I was completely digging
the floral and checks
and the fabric is so soft!

My father is from Kansas,
and my oldest lives in Illinois.
When we drive up there, the
vast acreage of windmills is
breathtaking just as the images
from Kansas plains of one small
windmill were in the day.
So, this fabric line immediately
took me to windmills.
Because I couldn't make
a decision, you get a 2 for 1 tutorial:)
Any block that gives the
illusion of a windmill works.
For example, pinwheel
blocks evoke that spinning motion.

I do my pinwheel blocks in
the traditional manner of drawing
a diagonal line corner to corner
on the wrong side of lightest fabric,
sewing 1/4" away from the line on
either side (shown above),
then cutting on drawn line
for 2 half-square triangle blocks.
Press to the darker fabric.
Four half-square triangle blocks,
rotated, make a pinwheel block.

Perfect pressing for less bulk
where the seams come together is
such an easy and cute look:)
ABOVE: The last seam joining
the 4 blocks is shown
horizontally below my thumb.
To the right of my thumb, I
have removed the stitches
in the seam allowance
from the previous seam.
BELOW: Once you do this, lay block
flat and press open those seams
to reveal a mini pinwheel.
Note that the seams of green
also rotate around the block.
Easy, flat seams;)

What you need to make
pinwheels shown below:
Green- 8 squares cut at 9" square
Yellow- 8 squares cut at 9" square.
Make 16 half-square triangle blocks.
Trim all to 8" for 7-1/2" finished squares.
Arrange into 4 pinwheel blocks.
Sew top 2 squares together then
bottom 2 squares together.
Press to create nesting seams.
Make 4 Pinwheel blocks.

Now for the indecision:)
As passionate as I am about
applique', sometimes paper
piecing is my go-to in order
to accomplish a look or the
precision I want.
Because I enjoy enticing people
over to the world of paper piecing,
this is where my brain switched
things up a bit.
Paper piecing is so
methodical and exact
and changes depending on
the fabrics and the layout.
It completely tickles my brain.
I used my, Blossom Swirl,
template for these windmills
but you could certainly go even
quicker and use the pinwheel block.
Using this block, I will do a
mini paper piecing tutorial in
case you are new to the technique
or find it overwhelming.

Gather Supplies and
make fabric decisions.
I always recommend using
one of the template pages as
a fabric guide.
As to supplies, not many are
needed to get moving:
1-Printed Templates for
as many blocks as you
want to make.
2-Glue stick
3-Add-A-Quarter-Ruler
4-Rotary Cutter/mat.
Optional
-small rotary cutter and board
for trimming near sewing machine
and
-rotating cutting board
from trimming sections.

I like to use a second
template page for staging
all my cut fabrics.
Section A has all my fabrics
laid out on top of it as
does Section B.
I need to lessen my
chances of getting confused:)

The other reason I like
my fabrics staged this way is
that I paper piece
factory style.
If I have 24 blocks to make,
I am sewing all my Section A1
to A2 pieces together first.
I will then add A3 to all of them.
Again...Lessen my chances
of getting confused.
This chain piecing process
allows me to not lose
my place on a block
if I get interrupted.

Section A1 is a lovely
green check with
sunflowers and it
gets glued in place
so we can build our block
from this piece out.

At this point, I have done
A1, 2, and 3. It is time to
add 4 on the other side
of the green center.
NEXT,
I like to have my templates
backlit so that I can see the
line to fold back on for trimming.

When you add a fabric,
fold the template page back
along the line between sections
(here it is the line between 1
and 4).
Use the Add-A-Quarter ruler
to trim a 1/4" seam allowance.
This ruler has a lip that fits
against the paper fold.
If you don't do this step,
you won't have a seam allowance.
See my mini trimming station
next to my machine?
I like getting my steps as much
as the next person but let's
be real-LOL.

We are ready to sew A4 to
A1 and we ALWAYS place
fabrics right sides together on
the UNPRINTED side of
the template, flip it over and
sew ON the PRINTED side
of the template.

IF you go to this LINK, you will see
how I get from this pic to the next
without pinning:)
Above, I have aligned A4 to A1
and below you see it in the machine
ready to sew ON the PRINTED side,
directly on the line.

There are ways to do paper
piecing without stitching
through the paper, I know.
It has never bothered me to
remove paper because it
is down time for me with
a favorite movie.
To make it easier though,
reduce your stitch length
so the paper is perforated
and will tear away without
a problem.
Every machine is different
but I had this set at 1.4,
about the size of a ball point pen tip.

Keep on stitching until
all fabrics are added.
Here is where that rotating
cutting mat comes in
handy....
Trim sections making
sure you have a
1/4" seam allowance.

Now all the sections
are complete and ready
to be sewn togther.

Flip B onto A.

PINNING!

Place a pin perpendicular
through each end point
as shown above
and below.

Once those pins are
straight, place a second
pin approximately 1/2"
within the end point to
avoid distortion.
Add 2-3 more pins for
stability then sew seam.
Remove paper from
seam allowances only
at this point.


Here is why I love paper
piecing....
Just rotate those blocks
and get a whole new look!

I went with this layout
because it felt more 'windmill'
to me.
As you assemble, remove
paper from each sewn
seam allowance to
reduce bulk.
Once a block is assembled,
you can remove all the
paper because you will
sew them together
like any other block.

Now it was time for a
couple of borders with
some signature,
Nestlings applique'.
Since I kept this to a
sunflower theme, time
to make some sunflowers.
Occassionally I do work
smarter not harder and I
was in luck.
In my stash of quilt stencils
that I collect from guild
show boutiques, I found
a wreath that could easily
resemble a sunflower with
a little imagination.
Four borders = 4 flowers.
I traced 8 so that I could
layer some color into it.
I did the same with my leaves.
The leaves are made with
my Large Leaves stencil.
One of our 'Welcome' gifts
was a pair of quilting gloves
from Christa Quilts that I said
I probably wouldn't use...
Never say Never:}
When I do fusible applique'
that will eventually be long-
arm quilted, I still have to make
sure all the raw edges are sewn over.
I like to do this free-motion
style for speed.
These gloves helped keep my
grip so I didn't stretch my
borders while trying to keep things
moving under my needle.

Some fun over/under loops
and my sunflowers came to life.

This quilt required:
1/2 Yard Each of
Red Sunflower print
Green Sunflower print
Cream Sunflower print
Navy Check print
Cow print
Cream Check print
Navy Sunflower print
1/4 Yard Each of
Gold Check print
Green Check print
Green floral print
Red Floral print
I hope this inspired you
to try paper piecing!
I was offered the opportunity
to quilt my own quilt on
a friend's long-arm machine.

Click on my photo to see
me in action-LOL!
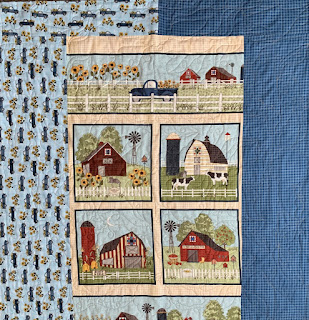
Remember that panels
make great backings!
This almost made me
want to name this,
Sunday Drive or
Country Drive.
Here is some of my
quilting close up.
I do love quilting that
leaf shape with swirls.

Instead, I went with....
Meet Windmill Plains:)


If you have questions about
this technique, please ask.
Thank you for following along:)
~Keep Stitching~