Showing posts with label Benartex LLC. Show all posts

Thursday, December 14, 2023

Benartex 4th Quarter Fun

 Welcome back for some Benartex fun!
For my 4th quarter project, I have
been playing with the American Spirit 

American Spirit

These were the fabrics I chose
to work with for this project
but there are many others 
to choose from.

If you saw my Ohio remix
in the Fat Quarterly in October, 
then you may know where this
is going:)
I took that block along with
another arrangement and
combined them with a
sweet and simple border applique'.

In January this new design,
'In Gratitude', will be available 
for purchase through my ETSY shop.
I love that it is simple to assemble
to help those creating quilts for QOVF!

In the meantime there are the holidays to 
enjoy with all my sweeties, more blocks
to finish, a new long arm quilter to find 
since I have moved:)

I hope you find a way to make the 
holidays special for you!
Thank you all for being a part of
my life see you in the new year!


Friday, July 21, 2023

Benartex Christmas in July 2023

 Jackie Robinson has 
done it again!
A Botanical Season is 
a lovely array of 
holiday touchstones from 
holly to Christmas ornaments.

I used techniques from
to adorn this sweet and 
simple table runner
with lovely amaryllis 
flower bouquets.

I am in love with 
these sweet flowers and the 
cute star negative space 
at their centers!

The pattern can be found
in my ETSY shop
Fun quilting 
suggestions included.

Come see how I used this
line in another project HERE 
to create a matching set!

Monday, July 10, 2023

Benartex Ambassador Project #3

 Christmas in July is celebrated by 
lots of quilters to get a jump on
their Christmas gift lists, so
I am going to offer 2
Christmas in July patterns
for my Benartex projects!

For project #3 I chose
to work with the new
line, Rhapsody in White,
arriving in shops now.
This line has a lovely
silky feel to it and there
are lots of cute
prints to choose from.
White makes me think of 
snowflakes though and how 
fun are those little
paper cut ones from 
our childhood.

In all honesty, I was never 
much good at getting them 
to look pretty, and I 
have worked very hard
to make the ones
pattern easy and cute!


The designs can be single
or layered as shown and
explained in the 
pattern instructions
found HERE.


These will become
timeless family gifts,
used every year.
Use them for pillows,
tote bags, candle mats,
mug rugs, Santa's
cookie mat....
The list is endless!

Come see how I used this
line in another project HERE 
to create a matching set!


Sunday, May 28, 2023

Twist & Turn Blog Hop

Hello and Welcome to the 
Twist & Turn Blog Hop
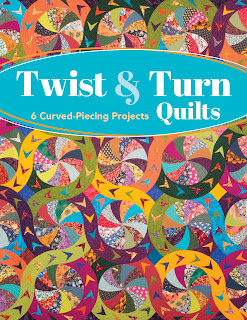
featuring a new book
by Cinzia White. 


Twist & Turn Quilts by Cinzia White, 

published by C&T Publishing, is 

landing in stores this month. 


I have joined with a group of exciting 

original designers to bring more 

ideas on how to meld different designs to 

make your own original quilt. 

These innovative designers are showing 

us a variety of their own circle designs 

using the latest fabrics to highlight the 

versatility of Cinzia’s Twist & Turn Quilts. 


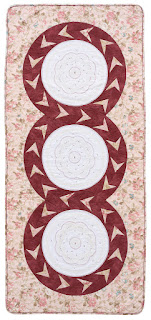
First let's take a peek at a couple

of designs directly from the book!


This simple layout
makes a great table runner
and the center can be anything!
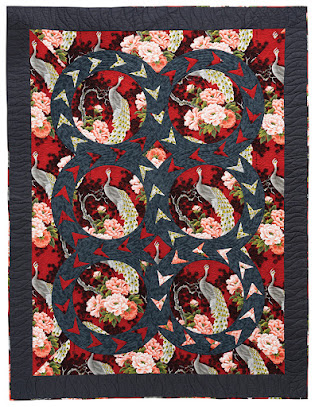
You can make it as
simple or difficult as you like...
embroidery or applique' or
fussy cut as in this next
example from Cinzia's book!


Cinzia reached out to me after I 
had posted my Benartex Ambassador
January group project, a tote.
She really liked this 
flower for the center 
of her block & she 
was right!!
Here is her mock up...
HOW Cool is this!!
It is mocked up
in the 

I have assembled the 
templates in 3 sizes
as a PDF download
in my ETSY shop.

SO many opportunities
for personalized design
with these templates
and Cinzia's book!

Please be sure to pop
over to the other 
designers' sites
during the HOP Dates
of May 25th-31st
for some FAB ideas
and a giveaway or 2:)


Thursday 25th: Monika Henry https://www.pennyspoolquilts.com/blogs/blog/twist-turn-blog-hop 

Friday 26th: Tammy Silvers

https://tamarinis.typepad.com/tamarinis/2023/03/twist-and-turns-blog-hop.html  

https://www.tamarinis.com/ 


Saturday 27th: Swan Sheridan

https://www.swanamity.com/ 


Sunday 28th: Laura Piland https://www.sliceofpiquilts.com/2023/05/twist-turn.html 


Monday 29th: Robin Koehler YOU ARE HERE:) https://nestlingsbyrobin.blogspot.com/ 


Tuesday 30th: Terri Vanden Bosch 

http://www.lizardcreekquilting.com/ 


Wednesday 31st: Cinzia White 

https://www.facebook.com/groups/cinziawhitedesigns


Saturday, April 15, 2023

Benartex Project #2- Peacock Petals

 We round up the first quarter of the year
with my second Benartex project....
Peacock Petals using fabrics
It hit store shelves in January so
keep an eye out for it.

Deep rich colors and 
a spring vibe kept niggling at 
the back of my mind.

I thought about 2 particular 
design workshops that I
adore teaching, Scrapplique'
and Fabric Collaborations.
Both concepts along with these
two fabrics inspired
my work for this challenge.
Thankfully the style of the fabric
goes beautifully with my own 
aesthetic of swirls and dots!


Admittedly, I got a bit carried away
with my design work.
It was only supposed to be
one small wall hanging.
THEN, I got excited about working
in lights vs. darks and so only
one of four blocks is done...
Now you will be intrigued enough to 
come back and see how it goes:)


HOW CUTE IS THIS?!!!?

I cannot wait to finish the 
whole quilt now!
My ambition thought I would
do it all by hand-LOLOLOL!!
SO many little circles.
Then I saw the work of 
Kyra Reps at Daytona...WOW!
So, I tried the prepared edge
applique' method using apliquick
bars that my friend,
Susan Marth, has been prodding 
me to try for years.
I am so resistant to change!
It did make my circles a bit
better but I really do loathe 
all that prep work.

So far this piece has 3 applique' 
methods on it:
Needle turn hand applique'
Prepared edge applique'
and fusible raw edge applique'.

Whatever gets it done right?

So, keep stitching in whatever
way makes your heart happy:)

Monday, January 30, 2023

Benartex Ambassador group Totes

Welcome back everyone!  
We invite you to join the 
Ambassadors as we show
off our fun group project...
TOTE BAGS:)
There is some 
adventurous stitching!

Our mission was to 
reinterpret the logo
shown below and 
that was really the 
only rule other than 
making a bag:)
Look at these gorgeous
fabrics we had to play with.
This is the Wave Texture
basics line by 
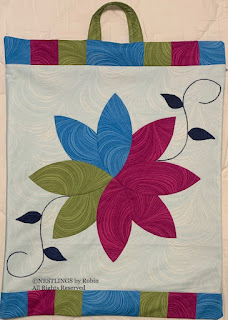
Based on the logo, I chose
Sky, Fuchsia, and Lime.

Wave texture fabric from Benartex

I love playing with this
simple petal shape and 
 I knew that I would
do hand applique' 
with embroidery, 
so here is BloomX:)

I also knew that I 
didn't want to do a 
conventional tote bag
but something more 
usable for me.
At guild last month, a
couple of members brought
in these cute project bags
with vinyl fronts and I 
was completely enthralled!
This direction meant many
challenges for me as I 
hadn't done a zipper since
7th grade Home Ec when
I made a slumber bag in
the shape of a roller skate.
I so wish I still had that bag-LOL.

First Challenge:
Learn how to put in a zipper-
CHECK!
I had to go buy a couple and 
they were on sale, buy 3
get 2 free....What was I 
going to do with 5 zippers??

The bag turned out so cute and now
I want/need more zippers-lol!
Of course, how I put that zipper
in was not how I would need
to do the one for my project.
And do you think I go online
and research first?
NO!
I like to make it up 
(and mess it up) as I go along:)

NEXT...Vinyl.
Again, let's make a mistake
first and then ask google.
Best tip for sewing vinyl:
Use tissue paper so that
it doesn't stick to your 
presser foot/feed dogs.
It sewed beautifully and
the paper comes right away.


Here is BloomX
sewn in between 
some color strips &
I remembered to add
my handle-whew!


Here is the vinyl
side of the bag 
showing some of 
my favorite tools
and a new workshop
sample for
Intro to Hand Applique'.


I do hope you will 
follow the other
Ambassadors as
they too share their 
creative interpretations
for Benartex!


Tuesday, January 24, 2023

Benartex Ambassador project #1

Welcome to my first 
Benartex Ambassador
project for 2023! 
Meet "Heartland" by 
Cheryl Haynes.
I was completely digging
the floral and checks
and the fabric is so soft!


My father is from Kansas,
and my oldest lives in Illinois.
When we drive up there, the 
vast acreage of windmills is 
breathtaking just as the images
from Kansas plains of one small
windmill were in the day.

So, this fabric line immediately 
took me to windmills.

Because I couldn't make 
a decision, you get a 2 for 1 tutorial:)

Any block that gives the 
illusion of a windmill works.
For example, pinwheel
blocks evoke that spinning motion.

I do my pinwheel blocks in 
the traditional manner of drawing
a diagonal line corner to corner
on the wrong side of lightest fabric, 
sewing 1/4" away from the line on
either side (shown above)
then cutting on drawn line
for 2 half-square triangle blocks.

Press to the darker fabric.
Four half-square triangle blocks, 
rotated, make a pinwheel block.

Perfect pressing for less bulk
where the seams come together is
such an easy and cute look:)
ABOVE: The last seam joining
the 4 blocks is shown 
horizontally below my thumb.
To the right of my thumb, I 
have removed the stitches
in the seam allowance 
from the previous seam.
BELOW: Once you do this, lay block
flat and press open those seams
to reveal a mini pinwheel. 
Note that the seams of green
also rotate around the block.
Easy, flat seams;)

What you need to make 
pinwheels shown below:
Green- 8 squares cut at 9" square
Yellow- 8 squares cut at 9" square.
Make 16 half-square triangle blocks.
Trim all to 8" for 7-1/2" finished squares.
Arrange into 4 pinwheel blocks.
Sew top 2 squares together then
bottom 2 squares together.
Press to create nesting seams.
Make 4 Pinwheel blocks.


Now for the indecision:)

As passionate as I am about
applique', sometimes paper
piecing is my go-to in order
to accomplish a look or the
precision I want.
Because I enjoy enticing people 
over to the world of paper piecing,
this is where my brain switched 
things up a bit.

Paper piecing is so 
methodical and exact
and changes depending on 
the fabrics and the layout.
It completely tickles my brain.

I used my, Blossom Swirl,
template for these windmills
but you could certainly go even
quicker and use the pinwheel block.
Using this block, I will do a 
mini paper piecing tutorial in
case you are new to the technique
or find it overwhelming.

Gather Supplies and 
make fabric decisions.
I always recommend using
one of the template pages as
a fabric guide.
As to supplies, not many are
needed to get moving:
1-Printed Templates for 
as many blocks as you
want to make.
2-Glue stick
3-Add-A-Quarter-Ruler
4-Rotary Cutter/mat.
Optional
-small rotary cutter and board
for trimming near sewing machine
and 
-rotating cutting board 
from trimming sections.


I like to use a second
template page for staging 
all my cut fabrics.
Section A has all my fabrics
laid out on top of it as
does Section B.
I need to lessen my 
chances of getting confused:)

The other reason I like
my fabrics staged this way is
that I paper piece 
factory style.
If I have 24 blocks to make,
I am sewing all my Section A1
to A2 pieces together first.
I will then add A3 to all of them.
Again...Lessen my chances
of getting confused.
This chain piecing process
allows me to not lose
my place on a block
if I get interrupted. 


Section A1 is a lovely 
green check with 
sunflowers and it 
gets glued in place
so we can build our block
from this piece out.


At this point, I have done
A1, 2, and 3. It is time to 
add 4 on the other side
of the green center.
NEXT, 
I like to have my templates
backlit so that I can see the
line to fold back on for trimming.

When you add a fabric, 
fold the template page back
along the line between sections
(here it is the line between 1 
and 4).

Use the Add-A-Quarter ruler
to trim a 1/4" seam allowance.
This ruler has a lip that fits
against the paper fold.
If you don't do this step, 
you won't have a seam allowance.
See my mini trimming station 
next to my machine?
I like getting my steps as much
as the next person but let's 
be real-LOL.

We are ready to sew A4 to 
A1 and we ALWAYS place
fabrics right sides together on
the UNPRINTED side of 
the template, flip it over and 
sew ON the PRINTED side
of the template.

IF you go to this LINK, you will see 
how I get from this pic to the next
without pinning:)

Above, I have aligned A4 to A1 
and below you see it in the machine
ready to sew ON the PRINTED side,
directly on the line.

There are ways to do paper
piecing without stitching 
through the paper, I know.
It has never bothered me to 
remove paper because it 
is down time for me with 
a favorite  movie.
To make it easier though,
reduce your stitch length
so the paper is perforated
and will tear away without 
a problem.
Every machine is different
but I had this set at 1.4, 
about the size of a ball point pen tip.


Keep on stitching until 
all fabrics are added.

Here is where that rotating
cutting mat comes in 
handy....
Trim sections making 
sure you have a 
1/4" seam allowance.

Now all the sections 
are complete and ready
to be sewn togther.

Flip B onto A.


PINNING!


Place a pin perpendicular 
through each end point
as shown above
and below.

Once those pins are
straight, place a second
pin approximately 1/2"
within the end point to
avoid distortion.
Add 2-3 more pins for 
stability then sew seam.
Remove paper from 
seam allowances only 
at this point.


Here is why I love paper
piecing....
Just rotate those blocks
and get a whole new look!

I went with this layout
because it felt more 'windmill'
to me.
As you assemble, remove
paper from each sewn 
seam allowance to 
reduce bulk.

Once a block is assembled, 
you can remove all the 
paper because you will
sew them together
like any other block.

Now it was time for a 
couple of borders with 
some signature, 
Nestlings applique'.
Since I kept this to a 
sunflower theme, time
to make some sunflowers.
Occassionally I do work 
smarter not harder and I 
was in luck.
In my stash of quilt stencils
that I collect from guild
show boutiques, I found 
a wreath that could easily 
resemble a sunflower with 
a little imagination.
Four borders = 4 flowers.
I traced 8 so that I could
layer some color into it.
I did the same with my leaves.
The leaves are made with
my Large Leaves stencil.

One of our 'Welcome' gifts
was a pair of quilting gloves
from Christa Quilts that I said
I probably wouldn't use...
Never say Never:}

When I do fusible applique'
that will eventually be long-
arm quilted, I still have to make 
sure all the raw edges are sewn over.
I like to do this free-motion 
style for speed.
These gloves helped keep my
grip so I didn't stretch my
borders while trying to keep things
moving under my needle.

Some fun over/under loops
and my sunflowers came to life.

This quilt required:
1/2 Yard Each of
 Red Sunflower print
 Green Sunflower print
 Cream Sunflower print
  Navy Check print
 Cow print
 Cream Check print
 Navy Sunflower print
1/4 Yard Each of
Gold Check print
Green Check print
Green floral print
Red Floral print 

I hope this inspired you
to try paper piecing!

I was offered the opportunity
to quilt my own quilt on
a friend's long-arm machine.
Click on my photo to see 
me in action-LOL!

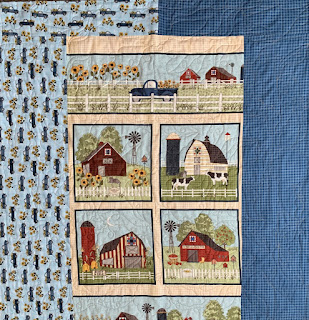
Remember that panels
make great backings!
This almost made me 
want to name this,
Sunday Drive or 
Country Drive.

Here is some of my
quilting close up.
I do love quilting that 
leaf shape with swirls.


Instead, I went with....
Meet Windmill Plains:)


If you have questions about
this technique, please ask.
Thank you for following along:)
~Keep Stitching~