Showing posts with label tulips. Show all posts

Saturday, June 26, 2021

FLOURISH QAL: Fabrics

 The first exciting step in starting a new
project....FABRICS!! 
YAY! YIPPEE! YAHOO!

I had a lovely floral print, 
"First Impressions" designed by
Mary Anne Henderson 
from Red Hen Fabrics 
for Northcott 
that started it for me.
The color is true in the pic above.
I used the colors in the print
to pull my applique' and other
piecing fabrics.

 I placed a ruler over the 
fabric so you can get 
an idea of the print scale.
This print worked perfectly 
with the size of the templates.
You want a small to medium
print so that the fun details show
in the smaller pieces of the design.

Here is a second colorway
shown with ruler and with
the F template since the print
is larger than the original.
It still shows a lot of
color movement though and
that is important too.

A couple of fabrics
pulled to go with
this firework/spray print.


A third colorway 
shown with ruler and 
F template for scale.


Fabrics pulled to go with 
the floral print.
I really like that architectural
print to the left and wonder 
what it may look like in an F:)


Let's look at some
other print / color options..
Wild bubbles above or
repro below?


Folk art floral above or
tulips below??
I love these tulips but will
be saving them for another project:)

As you can see,
there are soooo many options!
How do we ever decide
when we start  new projects?!

In case you missed the 
first post 
discussing some
of the basics, go
HERE to read all about it.

Start your stash hunt and 
next time we will discuss supplies.

~Keep Stitchin'~

Saturday, February 20, 2021

Well-Loved Ladies QAL: Ruffled Tulips

Welcome to block 12 
and our last block 
before we get to assembly.
www.nestlingsbyrobin.com

The photo above is a detail of
a circa 1860 quilt in my collection.
Normally I show you the block
and you can see a bit of it
in the upper corner, but I wanted
you to see the fun border
that was added too.

As we come closer to adding 
a border, I wanted you to see
that I had other options from
my collection and it was
sooo hard to choose!

The quilting on this one
is all over the place from
clamshell, to flowers, to 
individual symbols and 
small initial placards.

Gifted from a dear friend, 
it is the only one I have
of this design and I do LOVE it!

Let's talk Tulip variations.
Barbara Brackman 
has at least 36 variations
in her applique' encyclopedia
and that doesn't count
the ones with a basket,
bird, or something else.

It comes potted or in 
4 way arrangements.

My tulips are actually
2 parts, green and red, 
but so many German
folk art shows the 
tulips also having
a touch of gold so
I redesigned for that.
I imagine mine was meant
to be based on a 
triple layout but then 
a 4th was added for
her own variation.
In one of the BB links
below you will see some
lovely variations.

ASSEMBLY TIPS
The template for the 
red section shows
 a V but if it 
is rounded into 
a U while hand
appliqueing, it 
will still work.
Remember they are
flowers and do not
need to be exact!
Have fun:)

WELL-LOVED LADIES 
SAMPLER PATTERN
FULL PATTERN

Tulip TEMPLATES ONLY

where I showcase the 
variations of designs.

I am excited to announce 
this lecture is now available
in ZOOM format.
Guild program chairs can EMAIL me 
for availability:)


ADDITIONAL READING 
& Eye Candy:)
The links below go into more depth about 
either the history of the block OR 
FAB pictures of variations.
Barbara Brackman will blow you away
with all the variations she has accumulated!!
ENJOY~


Barbara Brackman
I searched "tulip" and
found THIS...
and THIS...


Beauty for the eye:)
What more do we need!

Wednesday, December 4, 2019

My New Quilting Stencils

In 2018 I designed a whole line of 
tulip themed quilting stencils.
Here I am with them in the Quilting Creations booth
at Houston Market...So Exciting!

I learned a lot doing these.  I assumed (HA) that I 
could magically transfer my outline applique 
drawings to stencil and I basically did.  
What I didn't take into account, since I love 
hand quilting, is that drawings for 
machine quilters need to be more adaptable to 
continuous line drawing.

Next time I will get it right:)
In the meantime, you can find all my stencils
on the Quilting Creations site.
Mine all start with RK### as you can see in 
the photos.  There are more than what is shown here.

  
 I had so much inspiration from my quilt designs. 
'Tulip Buds' (above) is from my 'Tulip Pinwheels' pattern.

'Tulip Flourish' offered up the sweet border above
and the four way design below.

If you aren't familiar with 'Tulip Flourish', 
you can find the pattern HERE.


 'Nouveau Tulips' came from my sweet, 'Tulip Star'.
 The pattern can be found HERE.
The fun thing about these stencils if you don't do your 
own quilting, is that they make lovely applique' stencils.  
Trace them out and connect the breaks in the line.

Back to work for me!  See you tomorrow~R

Cheryl Sleboda of Muppin.com for more blogs to follow.

Wednesday, July 3, 2019

ROUND ROBINS


First let me say that I have NEVER done or participated in a Round Robin for this reason, I am a Control Freak!  The idea of putting some fabric in a box and letting someone else make my quilt decisions for me and add other fabrics just makes my brain seize up. I have seen some lovely ones and some not so lovely ones too.  The idea intrigues me and seeing the reveals is inspiring but the need to be involved hasn't taken root.

Then I read somewhere about a controlled one and that made me want to do one:) Since I initiated this in my guild, I made up the parameters as shown in the first image print out.
I will say that participants didn't want anything
 too large so that limited my round sizes.
Here were the rules in case you want to do something similar in your own guild.
-This is a Round Robin personal challenge where you will make your own individual quilt using specific parameters given in 5 rounds
-Play along to make a gift for a friend, a charity donation, or just because it is fun to be a part of something and be challenged a tiny bit.
-There will be 5 rounds with one and two given together so that it will run for 4 months.
-Techniques will include applique' (by hand or fusible) and piecing with the finished size being roughly 48" square.
-Make it any color way that you love so that you will be excited to work on it.
Round 1: A 12" (finished) block with any applique you choose. 
I chose the tulip logo of our guild, Hidden Stitches.
Round 2: A 2" (finished) border to your center block. 
Border must feature at least one applique element from the center block. You can use any element, more than one, repeats in any way you choose.
Round 3: A 4" round of any pieced blocks.

Round 4: An 8" round with ANY triangular element (flying geese, half-square triangles).  Any combination of piecing and applique.
You can see that my big red tulip 
blocks will be cut to triangles.
Round 5: Another 4" round of any pieced blocks. The 4" was a minimum and they could go bigger if they chose.
You can see by my sketch that I made it way too complicated even though it is way cool (especially on a small computer screen:)!!
You see how far I got:)  I loved doing the applique but also became extremely busy in this time frame so the piecing was put on the back burner so to speak!

Now some of these ladies may hate me for posting these pics when I didn't catch them smiling and I can only hope I am forgiven when I say how much I LOVE THEM!!
They are members of my first 'Applique' guild, they are quilters, they share their stories and lives with me, and they are my friends and I love seeing them every month.
Lastly, they let me experiment on them when I have a new technique or Round Robin idea:)
My life here in Florida wouldn't be the same without these Amazing women!!   
We didn't all finish but the starts are pretty cool too! 
Cindy S. Love her flower and can't 
wait to see the rest.


Pat O. That birdhouse is darling!
It makes a sweet small piece the way it is.


Marva G. does amazing applique' work!
Again this could be done the way it is.

Jean R. used a block we had experimented with
 in a meeting and used it as her start point!
She even used the tulip as her 
quilting in the outer border.

Barbara D. did an amazing job! 
There was that sound in the room 
when people are impressed.


Lynn T. did the cutest kitty quilt and off setting 
border fabrics gives so much movement!

Then we come to our overachiever, Miss Liz M.
Above is the back of her quilt:)
Below is the front!
And I thought I had designed a lot 
of tiny bits for my borders!


THANK YOU all for being such great sports about trying out my Robin's Round Robin!!
I loved seeing every one of these and hearing about whether you loved or hated the process.
~Keep stitching

Wednesday, October 3, 2018

Travel Finds...


When we travel sometimes there is a tad bit of extra time to visit a shop or two and see if any treasures need to come home with me.
I am always on the lookout for old (older than these) blocks for my new "FABRIC COLLABORATIONS" Workshop.
These were found in Texas and the sweet Victorian carriage print was just too sweet to pass up.  With the 3 blocks, I can get 6 full squares that will be put with a different fabric and some applique:) Stay tuned!
When we went to Chicago this past summer, one of our stops was in West Virginia.  This circa 1940 tulip quilt is very interesting.  Not usually my go to for collecting but it will be in my "TULIPS" Lecture that is in development for 2020. The actual applique design is older but there was an applique revival in the late 20s-.... so there you have it, the old inspiring the new.  

Then I found this set of hand applique roses in another shop.  ALL my colors Except those pink ones....??? Those will be turned into something darling for the COC auction this year.  
Grandmas get ready for a bidding war:)

Lastly I found this adorable little green sewing machine.  It is from the 1930s I believe and will look fantastic in my work room that has green walls:)  Right now it sits on a chest in my living room with my runner, "Swaying Hearts Trio".  If you love embroidery, you can find it on my website under Quick Stitches or go HERE
Keep stitchin' 
R

Friday, May 20, 2016

Salt Lake City Spring Market

I left Tampa at 11am on Wednesday and arrived in Salt Lake at 5:50pm...that being 7:50 my time.
Some of the scenery from the plane was breathtaking!
Here is the great salt lake in the distance.
Then it is set up day! This sign says it all:)
 
The booth is ready to meet and greet!
I just love these quilts! They are my favorites 😊
Then I was off to set up my Sneak Peek display...that orange is wonderful.
I was a bit sad that my adorable little red chair doesn't show but it is about the quilts!!
We were done early enough today to run errands and enjoy a bit of the downtown City Creek mall...A must see.
Here is a fun shot of the floor from above.
My Tulips Tiled is the 3rd quilt up from the bottom. 
I hope you enjoyed this sneak peek at Market and there will be more to come!


Wednesday, April 15, 2015

TIP TOE THROUGH THE TULIPS.....

Are you humming along yet?
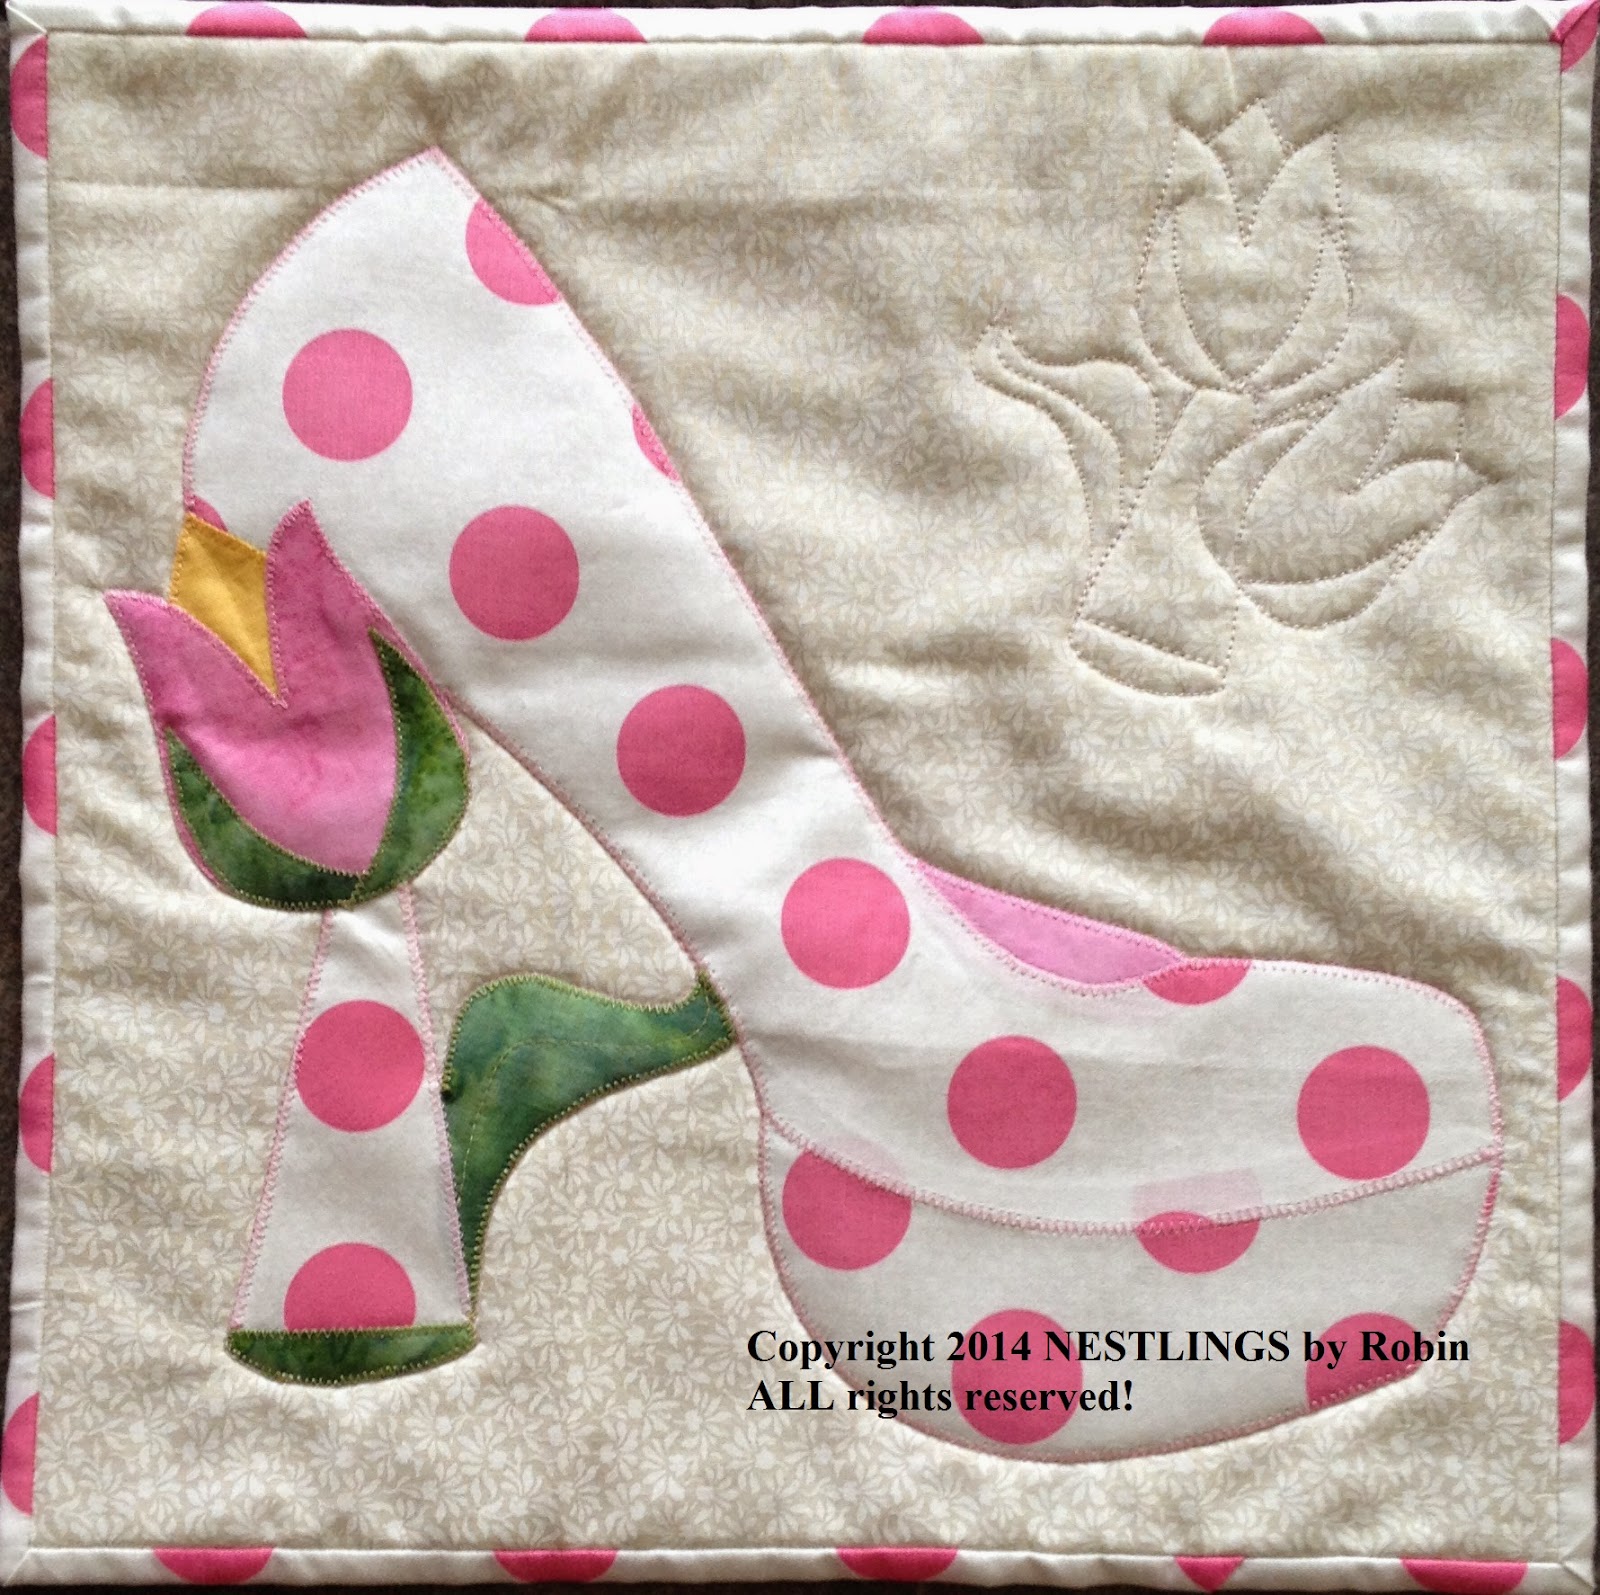
Tulips are one of my favorite flowers and I couldn't let April go without finding a way to add tulips to the design.

http://www.nestlingsbyrobin.com/bom-2015.html

The Polka dot is from an Easter dress that I made one of my daughters when she was about 4 or 5 years old.  This little remnant has been sitting in my stash for a VERY long time:)  The print is a bit large scale for the size of the shoe but I love it.  Print size/scale is always a consideration in applique templates, but here I decided to throw caution to the wind and play with placement of the Polka Dots in the shoe areas as well as the binding.
 
As always, the pump is 12" square to fit on the originally designed (by me) Ackfeld metal hanger. 
 
Hopefully you have already signed up for the Starter Kit.  If not, this BOM is open enrollment so still plenty of time.
 
Since it is now April 15th, the templates for the April shoe are available for purchase on my website BOM 2015 page.
 
**NOW A WORD FROM OUR SPONSOR:)
Originally this project was set up so that you would pay for the templates and they would be an immediate download.  Due to a VAT (Value Added Tax) put into place overseas on digital products, I had very limited options as to how I could keep the digital aspect but not be subjected to a very disorganized new law.
 
When you pay for the templates on my website, a payment notification will be sent to me.  Once I have received this notification, I will then email you the PDFs of the templates.  Please be sure that your email address associated with Paypal is correct so that you can receive these files.  I will email within 24 hours of payment.  Thank you so much for your understanding.
**End of message**
 
I am very excited about watching this BOM progress and seeing how all of you use different fabrics to achieve a new shoe each month.  Please share your progress on my FB page.  This is also where you will find additional tips about how I went about making these sweet shoes.
Happy Quilting:)