Showing posts with label fabric. Show all posts

Friday, June 18, 2021

FLOURISH: New QAL

 Well-Loved Ladies was a Huge success
and we still have many that are 
working on it because it really
isn't a quick project:)

As promised many moons ago, 
a smaller more attainable project
would be next so that those 
intimidated or not up to the 
task of WLL would be able to
join the quilt along fun and 
sharpen their skills for when
they are ready to tackle WLL. 

Twice a month starting July 1st,
I will present a tutorial via a
post here & FB that prepares us 
for the next step in the quilt along.

You will need a pattern to participate

 in this quilt-along.


The pattern has been written for
fusible applique' and will be 
offered in PDF and print form 
with all full-sized templates.
I will address using the templates
for hand applique' in a blog post
when we get there:)

Techniques involved will include
general piecing of flying geese units
and half-square triangles, applique'
(hand or fusible/machine), & embroidery.

Of course, there will be some video assists
to help in the process.

We will be doing all the discussion and
ooohing/aaahing of fabric choices over
in my FB group, Robin's Rocking Needles.

As before, over the next few weeks
expect multiple blog posts leading up to 
our big reveal day where I will discuss
fabric selection and supplies so you
can start preparing and be ready to go
as soon as you get your pattern.

Please leave a comment here if you have
any questions or email me,
robin@nestlingsbyrobin.com

I will be stitching along too as I make
another one in fusible applique' in 
another color way.

Until next time,
keep stitchin'~

Sunday, August 11, 2019

What EXCITES you about quilting?

Is it piecing a new quilt top or the enjoyment of slow stitching while watching a good movie?
Is it making new friends in guild or taking a class at a big show and learning a new technique?
Or, is it the FABRIC that comes out in new colors and designs every season and we just can't seem to have enough of it on our shelves (in drawers, under desks, stuffed into every nook and cranny)!!

Most quilters have a color palette they are drawn to and maybe a style of design as well.
When I started collecting antique blocks, I noticed I was really drawn to the fabric design more than the block itself.  This is when I actually took account of the fabrics on my shelf. I am drawn to black, gold, green, red, orange, and off white. When I look at my designs, I see lots of whimsical swirly twirly florals that send my creative brain off the charts! There are so many antique fabrics in that genre of design-YAY!!

I believe that as humans we have a built in 'want' to create! That is what we do and have done since the beginning of time!  I also believe that the quilters that say they aren't creative just need a nudge, a new way to look at the world around them and the best place to start is your fabric world.
FABRIC COLLABORATIONS (Houston class #417) helps you look beyond to create something new.
JOIN ME in HOUSTON and play all day.  I mean it! The whole class is play time and there are NO mistakes to be made!

Below is a series of blog posts discussing different samples you will see in class (touch and pet if you need to) and how I came to design them.

https://nestlingsbyrobin.blogspot.com/2018/09/fabric-collaborations.html

https://nestlingsbyrobin.blogspot.com/2019/02/workshop-development.html

https://nestlingsbyrobin.blogspot.com/2019/04/appraisals-and-workshops-and-quilts-oh.html

https://nestlingsbyrobin.blogspot.com/2019/06/romantique-is-simply-vintage.html


TO DO BEFORE CLASS: Find an orphan block in your stash, preferably between 8”-12”.
IF you do not have an orphan block that contains a Printed fabric you Love, then please make a block using a print that

speaks to you. It can be as simple as a 9 patch since we are going for fun and easy not heirloom!
Small to medium prints work the best and the more details, the better it will be for inspiration.

Additional Fabric requirements:
__ A FQ of a coordinating (to your block) fabric that reads as solid for borders.

__ 2-3 coordinating FQs for design expansion to borders (prints and/or solids).

Additional supplies: (FULL LIST IN CATALOG)
__Rotary Cutter, mat (12” x 18” is fine), ruler 6” x 24” (minimum of 3” x 18”)
__Threads to match fabrics for sewing assembly and applique
__12 wt. Sulky thread to match fabrics for Embroidery details (hand or machine)
__Scissors: fabric and paper
__Pen, pencil (preferably mechanical), white chalk pencil for dark fabrics, and eraser
__pins
__glue stick
__½ yard of paper-backed fusible web if doing machine applique
__$20 kit fee (custom stencils, chalk papers, handouts)

How many of you have are on the more 'experienced' side of quilting and looking for something new?  I can't wait to meet you!

Keep quilting~


Thursday, April 4, 2019

Appraisals, and workshops and QUILTS, Oh My:) -part 3

Houston Bound and I haven't stopped squealing with delight:)

So SWIMMING SEAHORSE which I recently taught to the West Pasco QG will be my second class and I didn't want to push both together in one post because I had so many lovely photos to show!

Below you will find photos from the latest Seahorse class and it really shows how different fabric choices change the look.
Here is the original sample made by me:
This is such a great Quilt As You Go technique 
that can work for so many things!

We all LOVED the polka dot seahorse!  
That is the fun of workshops to me, seeing what 
fabrics everyone brings and then the 
subsequent, "why didn't I think of that?".
 This seahorse has great value and 
keeps its soft feel!
You don't have to go bright to 
get a good composition.
 I say you don't have to go bright but
I LOVE this orange one...what a surprise:)
For those of you that don't know, 
I love the color orange:)
Better than the orange seahorse is 
the gorgeous smile behind the quilt:)


Marilyn started her
piece in class and once home decided there wasn't enough contrast so I received this pic later in the week where she made a sweet coral seahorse and WOW!


THANK YOU to all the students who gave me permission to photograph their works in progress!!

I love my job and meeting Fantastic students.  I really love lunch time when I get to hear the stories behind these quilters. I try to find time to ask, "what did you do in your life before quilting?".  
This last class had a Navy Veteran, a retired RN, and a retired Judge who is in her 80s. They are all inspiring to me when I think of the times they lived in and what they accomplished.

Keep quilting ~~


Wednesday, April 25, 2018

2018 Spring Clean your Studio...?

THANK YOU, CHERYL!!
This really was the kick in the pants I needed and I am sure there will be major moments of studio envy but I am pretty in love with my own now too:)
www.nestlingsbyrobin.com

Spring Cleaning NEVER sounds fun but I would be in my Happy Place, right? ! ?? !! 
It really hasn't been very happy lately though because we didn't move on our 3-4 year schedule (no military transfer since Jim retired in 2016) so stuff started piling up. This is what greets me immediately as I walk into my studio....Overwhelming!
If I make the photos smaller, will it make the mess appear smaller too??? 
Before Left
Then about 1-1/2 years ago, I started seriously training to become an appraiser and more stuff started piling up.
Talk about Books gone Wild due to appraisal training and the generosity of others plus guild bargains.  There are close to 50 books in this pile plus vintage/antique fabrics for categorizing.


Mermaid workshop sample
NOW I CAN SEE MY FLOOR!!!
To which my husband replied, "you should always be able to see your floor".  Go Away. I don't need that kind of negativity:)

It may not look tidier to some but it is SO MUCH better!

As we look around to the right of the room, you will see my 12" square cutting surface and maybe a 24" x 12" sewing area. The rest of my space is piles of fabric/items I never officially unpacked because I wasn't sure we were staying here...We are:)
Before right

Then there is the closet.  I was so excited to have a whole closet with shelves but I could never decide what to do with the empty, hard to get to, space behind the wall to the right or the best way to utilize the rod across the length of the closet.
Stuff has just been crammed in there for 6 years. 
Before closet
Three months (3 years-whatever!) before Cheryl even posted about this hop I had seen a cabinet that I wanted for my room because I knew it was a disaster and needed an overhaul.  It was the cutest 'Gentleman's Cabinet' in a cream over maple wood.  I asked the shop owner if they would take less, "yes".  I promised myself once there was a bit extra in my budget I would get there....life intervenes!
Finally I made it there and then there were 2 other pieces that were so cool and I had to choose.

I felt like Goldilocks.  One cabinet was too much wasted space. One cabinet was Perfect (a vintage metal Doctor's cabinet with glass shelves and a light came on when you opened the doors) but too expensive. Back to my little cream cabinet that was just right in space and price:)

New cabinet progress
Linen drawer -organized hankie samples
 A place for my vintage hankie/embroidered linens collection!
Progress
 More progress being made!
( I can start showing bigger pics now for more impact:)))
Grandmas Thimbles found
Amazing what you will find when cleaning....
My grandmother's thimble collection!

Biscuit Love
Look who else is happy about the clean space he now has.
This is Biscuit:)
No more trying to Cram in under because there is actual
room to stretch out and be comfortable:)

task lighting
I FINALLY have a bit of task lighting too!
Thank you IKEA!
Can you see the small light off the top of the bookshelf? 
I have multiples of that little light. 
It was $15 and works wonders because it has a gooseneck
style that can be positioned anywhere.
I can see my cutting mat, my smaller piles make sense
now and have an order to them, and a couple
of new items were added to make me smile!
Here is one of the new pieces that I
picked up on my way to Paducah. 
It said it was a planter but it hadn't been used and
I can 'plant' fabric inside there instead:)
The whole closet didn't get straightened the way
I may have liked so I won't bore you
with another pic of that.  Instead you can see the cute
little ship's captain desk that houses my bead
collection along with a few 'proud of me momentos'. 

Now for a bit of a brag before I leave you:)


http://www.americanquilter.com/aq_magazine/digital_issues.php
"ROBIN'S WREATHS" at Paducah
in the Authors Section!!!
This was created in the mess you witnessed
above and I am still on my high from
being in Paducah this past week. 
AQS members receive a magazine called
AQ magazine as part of their membership.
"Robin's Wreaths" will be the series quilt this year as a BOM.  
If you are not a member, consider becoming one. 
There are many other benefits like all the
access to their digital content as well (a treasure trove in itself).
I do hope you will follow me on FB: 
Instagram: @nestlings1 and sign up for my newsletter
by emailing me at robin@nestlingsbyrobin.com
THANK YOU!

STAY TUNED for more studio envy coming your way: 
April 23 - Lori Crawley Kennedy - http://theinboxjaunt.com
April 24 - Jennifer Thomas - http://curlicuecreations.blogspot.com
April 25 - Robin Koehler - http://nestlingsbyrobin.blogspot.com
April 26 - Andi Barney- https://www.andibarney.com/
April 27 - Misty Cole - http://www.mistycole.com/blog
April 28 - Carolina Moore- http://alwaysexpectmoore.com/
April 29 - Heather Pregger - https://heatherquilts.blogspot.com/
April 30 - Linda Bratten - https://lindabcreative.blogspot.com/
May 1 - Lisa Reber - https://dippydye.blogspot.com/
May 2 - Teresa Coates - http://www.crinkledreams.com
May 3 - Lisa Chin - http://www.lisachinartist.com/
May 4 - Jamie Fingal - http://www.jamiefingaldesigns.com/
May 5 - Sam Hunter - www.huntersdesignstudio.com
May 6 - Jessee Maloney - www.artschooldropout.net/blog
May 7 - Randa Parrish - http://www.sewartsyfartsy.com/
May 8 - Sarah Vedeler- https://meaningoflifedesigns.com/
May 9 - Jessica Darling - https://jessicakdarling.com/
May 10 - Melody Crust - http://www.melodycrust.com/
May 11 - Debby Brown - http://higheredhands.blogspot.com
May 12 - Cheryl Sleboda - http://blog.muppin.com


Wednesday, April 15, 2015

TIP TOE THROUGH THE TULIPS.....

Are you humming along yet?
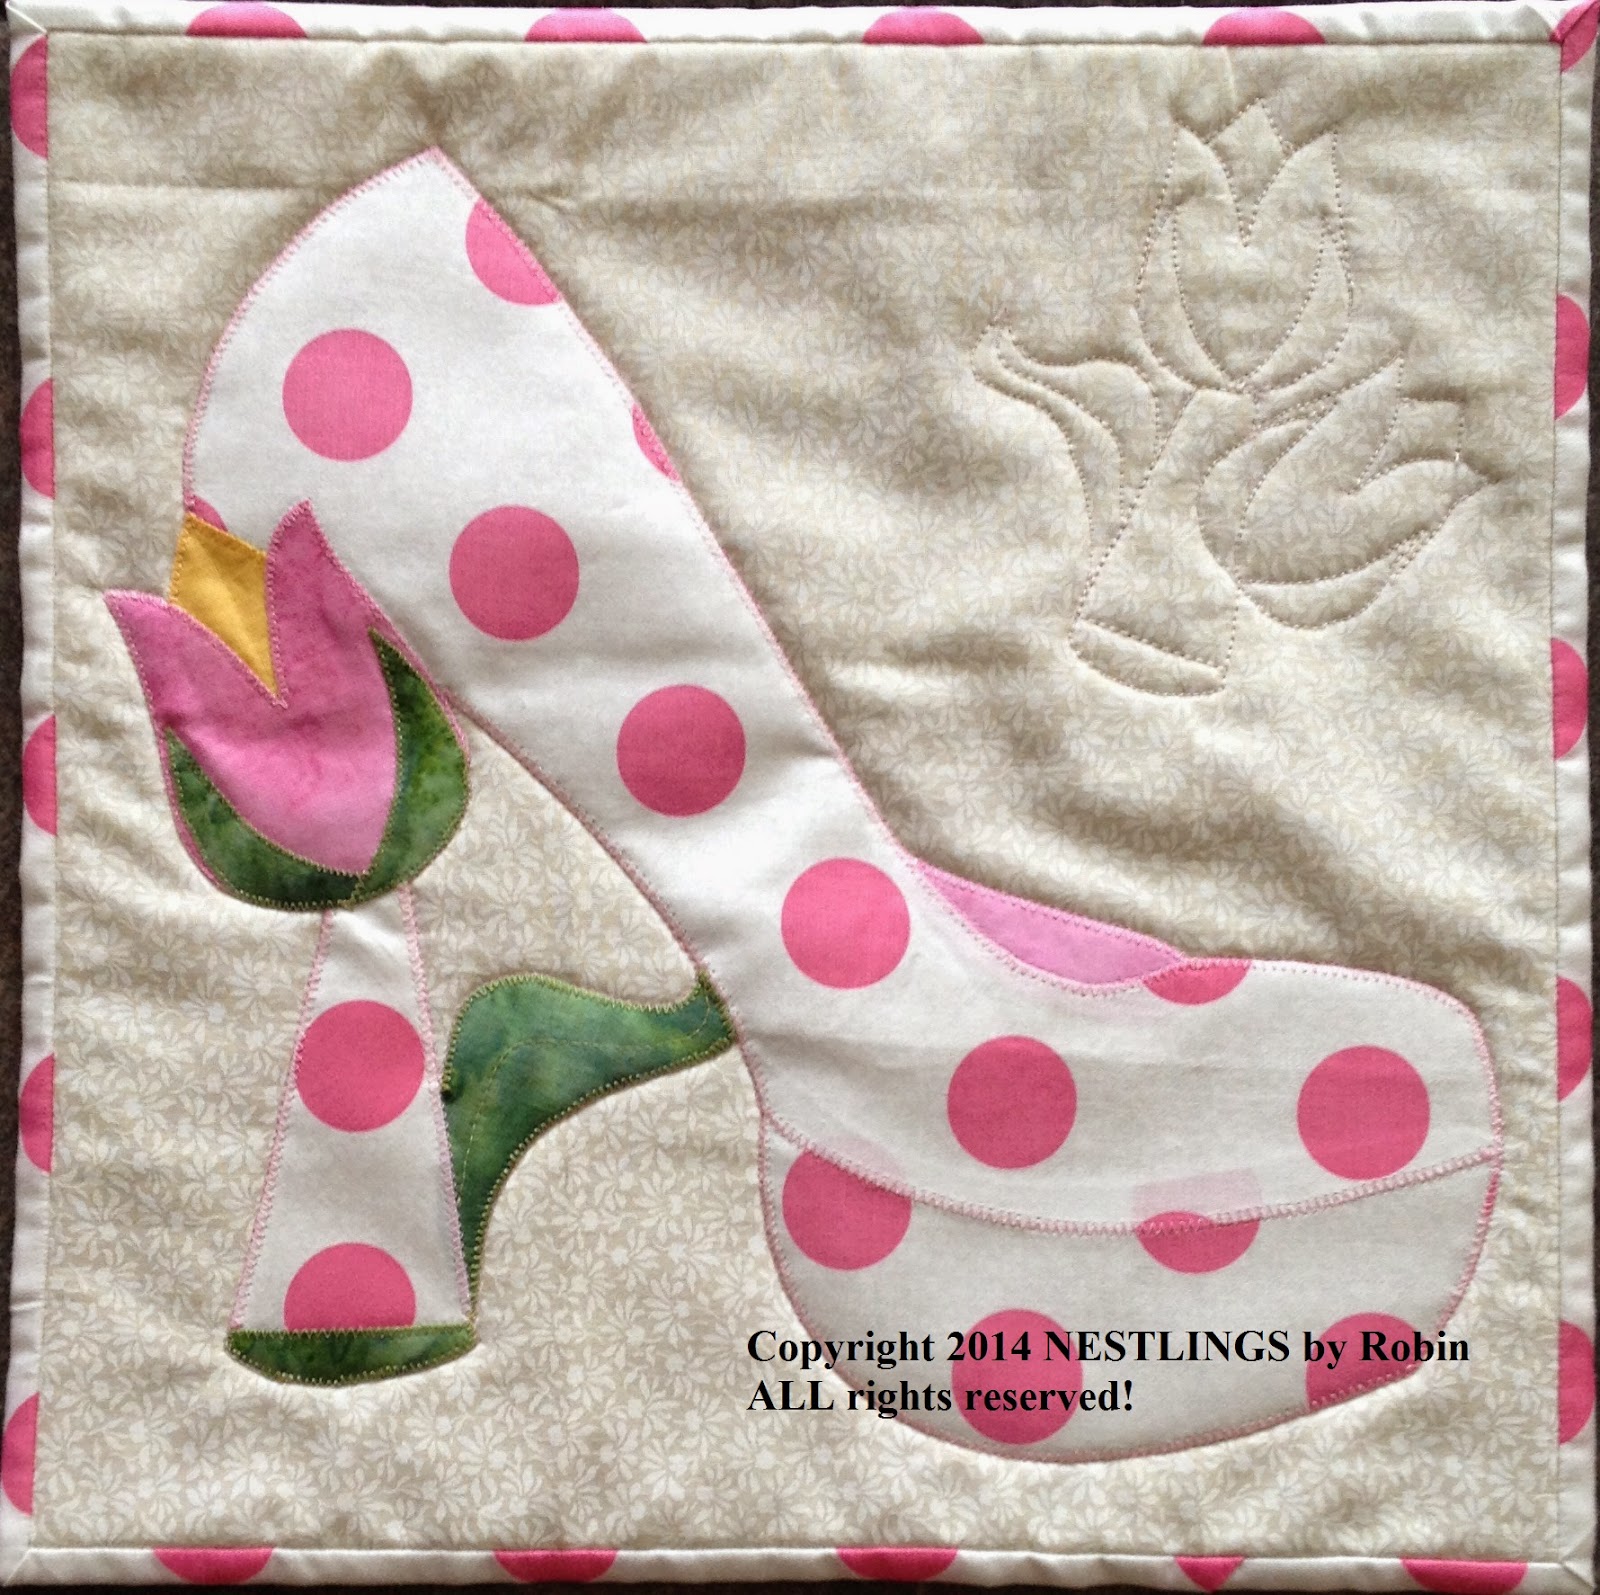
Tulips are one of my favorite flowers and I couldn't let April go without finding a way to add tulips to the design.

http://www.nestlingsbyrobin.com/bom-2015.html

The Polka dot is from an Easter dress that I made one of my daughters when she was about 4 or 5 years old.  This little remnant has been sitting in my stash for a VERY long time:)  The print is a bit large scale for the size of the shoe but I love it.  Print size/scale is always a consideration in applique templates, but here I decided to throw caution to the wind and play with placement of the Polka Dots in the shoe areas as well as the binding.
 
As always, the pump is 12" square to fit on the originally designed (by me) Ackfeld metal hanger. 
 
Hopefully you have already signed up for the Starter Kit.  If not, this BOM is open enrollment so still plenty of time.
 
Since it is now April 15th, the templates for the April shoe are available for purchase on my website BOM 2015 page.
 
**NOW A WORD FROM OUR SPONSOR:)
Originally this project was set up so that you would pay for the templates and they would be an immediate download.  Due to a VAT (Value Added Tax) put into place overseas on digital products, I had very limited options as to how I could keep the digital aspect but not be subjected to a very disorganized new law.
 
When you pay for the templates on my website, a payment notification will be sent to me.  Once I have received this notification, I will then email you the PDFs of the templates.  Please be sure that your email address associated with Paypal is correct so that you can receive these files.  I will email within 24 hours of payment.  Thank you so much for your understanding.
**End of message**
 
I am very excited about watching this BOM progress and seeing how all of you use different fabrics to achieve a new shoe each month.  Please share your progress on my FB page.  This is also where you will find additional tips about how I went about making these sweet shoes.
Happy Quilting:)

Friday, October 26, 2012

Fused Glass?

My husband knows I like shiny things....So, for Christmas last year he bought me a beautiful pair of earrings that were made of fused glass. The second part of the gift was a Groupon for learning to make your own fused glass. How cool is that?
 
The pic above shows my Poinsettia pattern that I have used in a couple of different quilt patterns.

Here it is in glass. This really solidified my love of fabric.  In fabric I can layer bits upon bits but in glass it is more puzzle like.  It is taking my brain a bit to follow which I am sure is good for the neurons but can be a bit frustrating.  I had all my pieces cut out before the class helper told me that wouldn't work because of the melting process-duh!  
 
So I recut pieces until they fit together better leaving me with all these leftover bits.  I don't know that using quilt designs in fused glass is the way to go-would have been better with stained glass.


The leftover bits are useful though because they get crushed into finer grades called Frit (don't know how they came up with that word).  These can be sprinkled around in your background to add color or texture.
Here is the final piece ready for the kiln.  I tried using frit to fill in underneath pieces I didn't want to bend downward in the firing process...Now I see the mistake in that!
It is hard to tell by the pictures but I had chosen a clear piece that had a great texture in it not realizing that if I wanted a full fuse the texture would melt away.  Therefore I had to choose a medium fuse to keep some of that texture and in doing so, the flower didn't quite melt the way I wanted.  Plus, using some of the frit to fill in made the petals look a bit globby.  Note to self-next time use clear bits OR just let the petals melt down.  This was class #2.

For class #3, I chose to try my hand at earrings with a full fuse.  We shall see!  Here they are ready to go to the kiln.  Hope they are done next week:)  I only have 3 more classes and need to focus on what I want to accomplish.

I don't think glass work is for me.  My fabric work is just so soft and fun and easy and, did I say soft.  My hands are starting to look all chopped up but I do like working with power tools again!!  :))  I am glad I tried it-it was a great gift!  I can appreciate the jewelry more now when I see the pieces at shows but I will keep my fabric obsession!

Today is Off the Wall Friday so don't forget to peek in there to see what others are working on!

Monday, April 25, 2011

Happy Belated Easter and ...

what a crazy month it has been:)

Since I last wrote to you, I have:
-taught another class
-helped write the standards for a local Saturday Market
-prepared my Paducah entry for shipping-- "Groovin' Grove" was juried in:)
-worked up my business taxes so my husband could do our family taxes-yuck
-finished all the minutes for 2 boards I sit on and submitted my resignation for both due to the impending move
-mapped out entries for local guild show and started actually making 3 of them--they are entered but not started. How's that for confidence? :)
-continued to work on a new design in applique along with a fusible version
-reviewed a pattern for another designer
-showed our house 3 times even though we are renting
-had my pup in for a follow up visit because her stitches didn't look well and we were kenneling her for a week--she was fine:)
-prepared moving lists
-prepared lists for houses to look at
-went house hunting in FL and bought a house
-started one of the miniatures for my quilt show
-start preparing for Easter company which will consist of both my daughters and one boyfriend. It will also be my daughters' birthdays so we celebrated that too.
-had both the sewing machine and computer take a vacation-Yikes. Both were fine too:)
-started cleaning out studio and while doing so found this bunny below.....

This design was suppose to be a wall hang with 4 blocks where 2 would have chenille bunnies and the opposing 2 would have chenille carrots. It is amazing what you find while cleaning:) I found a few started designs that now I have to decide how to proceed. Since I only had one bunny done, I decided to stop there and make a smaller table topper out of it. This measures approximately 13" and turned out very cute! My older daughter took it for next Easter.

Now what to do with the others?? My cleaning will result in fabric going to a friend, a quilt club, and then donating other supplies to a local Girl Scout troop.
I have to keep editing and forcing myself to stop being such a pack rat!

Now back to cleaning and designing- I have to get lots done on this end before all is packed away for a month...
Have a fabulous week!

Tuesday, December 29, 2009

NYC Mood Fabrics

PICK A BOLT...ANY BOLT?

For Christmas this year, my family went to NYC. My youngest daughter and I are big Project Runway fans and so MOOD was top on our list of places to go. As we walked through the garment district, my daughter was fascinated by all the wonderful fabrics full of sequins in the windows. I was busy reading the addresses looking for MOOD. It is more elusive than that, based in an older business building with a lobby and old elevators shuffled up and down by uniformed gentlemen. For those of you who don't know me, I am very easily entertained and find wonder in all kinds of inconsequential things that most don't notice, so riding in the elevator run by an operator was a fun little treat for me.
We arrived on the 3rd floor and not knowing what to expect, I was blown away. My husband who sat reluctantly through this past season with me so I wouldn't have to watch alone, commented that the show does not do the store justice and he is absolutely right. As a quilter, I am used to quilt shops with little bolts of fabric I can carry around with me...I was not physically in shape to do the same here. I arrived with a specific idea in mind of what I was looking for and that was helpful or I would have left empty-handed due to my indecisive nature.
My find was this beautiful lightweight knit that will eventually be an artistic jacket to be worn all winter and spring.

I didn't even look at all the trims and buttons that were available or I would have gone insane with envy. The wall in the background is just one of 5 or 6 walls of trims. The button boards in the foreground are again just a teeny tiny example of what is available. Being completely enmeshed in my own fabric search, I didn't realize (fortunately) until the end when getting fabric cut that there were other floors of fabrics. The above picture also shows a Project Runway board that has photos of some of the outfits along with fabric swatches...just in case you need to own the same fabric from a show fashion.All the fabrics are labeled and I will watch season 7 with a new eye. The staff was very very helpful and cheerful even.

Now I don't have a picture but the crazy little tidbit to this story is this: I had forgotten my camera the first go around and luckily our hotel was only 4 blocks away. My family was forced to go back, get the camera, and return to MOOD (where I refrained from more shopping) so I could have pictures. On our way back to the shop, my daughter and I spotted Nicolas Putvinski from season 6 leaving the block and he walked right past us but I was too chicken to call him out. He wasn't our favorite from this season due to his catty behavior. I hope he was edited badly and still wish him luck. It must be very difficult to work in those rushed conditions and the heavy competition of the NYC fashion industry.

In closing: Thank you MOOD and my family for indulging me.

Monday, October 5, 2009

Skinny Kitties by Pepper Cory

Meet the "Skinny Kitties"
Over the weekend I quilted this wonderfully whimsical sample showcasing Pepper Cory's new fabric line for Avlyn Fabrics.

I have long thought there weren't enough gray or brown fabrics around and now that problem has been solved. There are some fantastic accent fabrics in this collection. Be sure not to miss them at Market next week or ask your local quilt shop about ordering them for the shop. There is something for everyone in this line.


Friday, May 8, 2009

Wonder Under the Waves

I belong to an art group named Artrageous and when we got too big, we splintered off into smaller groups. A few times a year the smaller groups reunite into our larger group for wonderful show and tells. My smaller group is named Beachrageous since we all live out near the beach.
The five of us came up with our own challenge:
Under the Sea theme
Must use a piece of the five exchange fabrics in the background
Must conform to the preset shape agreed upon
Any embellishments work
We display together but each own our own section
I will not be showing the final 5 together until after the quilt guild show that we are entered into is over (May 15th and 16th- Crystal Coast Convention Center, Morehead City, NC).
Once I got going, I had a really good time. The background is pieced 2" squares. The applique is fusible with all free motion quilting. Embellishments include 3d fan coral, beadwork, beaded fringe, shells, and shrink art fish and sea anemones.

This detail shot shows the fan coral and a few anemones. I have decided to recreate this piece to sell since this one is for exhibit only.

Tuesday, February 3, 2009

Shop Hop in NC


Here in southeastern North Carolina we are preparing for the annual shop hop called "Romancing Eastern North Carolina". From Wednesday 2/4- Saturday 2/7 come visit 8 shops from Jacksonville, Morehead City, Washington, New Bern, and Kinston.

Again this year I was asked to design a new pattern for The Quilted Butterfly in Morehead City. We decided to go with a small project that is useful, a stashbuster, as well as a doorway to the best addiction of all... beading:) Here is the "Sparkling Scissor Case".

I love the way beading can completely change the look of a fabric. The fabric used for this design was ideal for allowing someone to try their hand at beading by following the design of the fabric. They can embellish as much or as little as they would like. There are two sizes in the pattern for a 10" and a 7" case. You can see the difference in the fabric between the larger embellished case vs. the smaller unembellished case. I can't wait to make more of these.